|
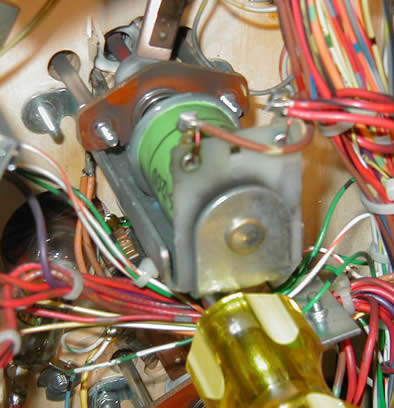
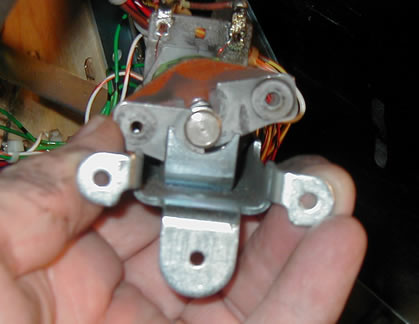
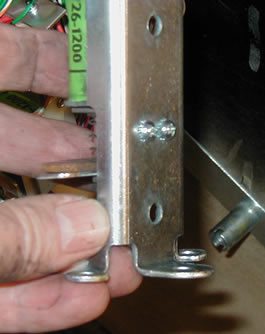
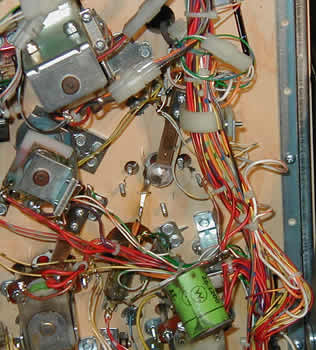
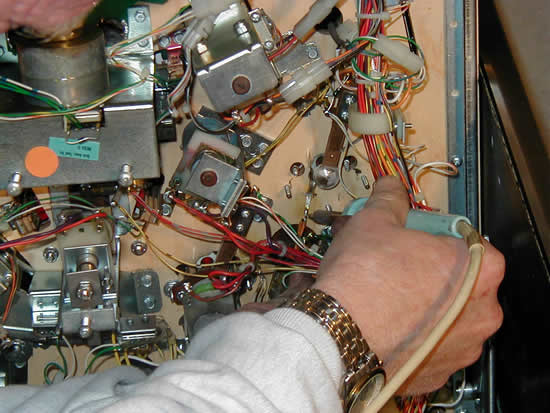
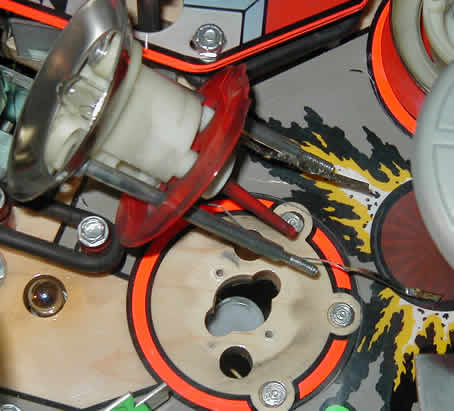
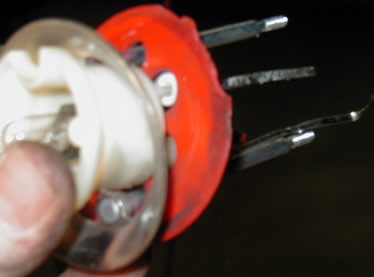
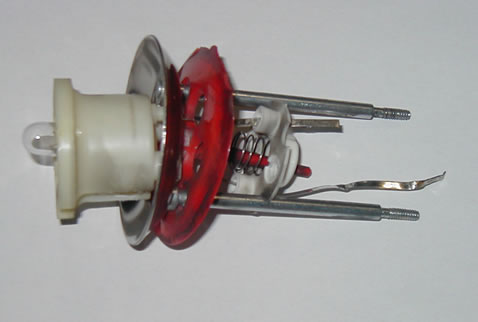
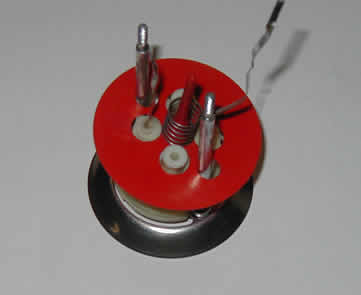
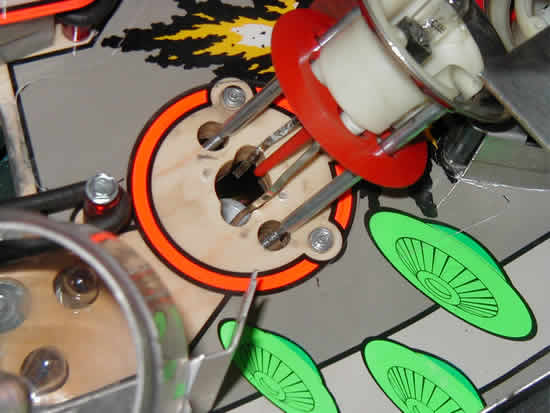
This page is about repairing a "jet bumper" also known as a "pop bumper." To repair the Mylar you should wait until you've removed the pop bumper parts and remove the Mylar (if it's there) and stick the new one on. Rather than buy a bumper mylar ring, I sometimes create the ring by using a compass cutter I bought at Hobby Lobby using a similar mylar circle radius to the one that was on the game. Some of the mylar rings you can buy are non-adhesive and lay flat. Personally, I like the adhesive backed kind because the non-adhesive mylar seems to trap dirt under it and wear away at the playfield's artwork. Note that something that can make life easier for a person new to the repair/rebuild process is to take before and after pictures with a digital camera. Shoot some pictures of the pop bumper from the top of the playfield with the bumper cap and bulb removed (don't forget to show the bulb socket orientation in the bumper body and the skirt if it has a pointed tip on it). Then lift up the playfield and take pictures of the pop bumper from the bottom side showing the wiring connections for the bumper socket leads/wires, the coil position in the bumper bracket assembly, and the spoon switch wiring and contact spacing. This will give you a reference for later if you find yourself wondering how things were assembled. For this discussion, and accompanying pictures, the thing that made me initially rebuild my pop bumper was the chewed up "skirt" (red in this case). Other reasons to repair a pop bumper are that one or more of the threaded shafts on the bumper ring has broken off or the metal/fiber yoke is broken. I've even come across a broken bumper bracket that holds everything in place on the underside of the playfield. One last reason is that the coil tubes can be pretty worn and dirty if the game has seen a lot of action. When I restore games, I always dissasemble the pop bumpers and replace worn parts as well as buff the bumper ring so it's nice and shiny. I need to remove the pop bumpers anyway since when I do a restoration, I remove everything from the top of the playfield. Process Observing the pictures below, you can see that I start by first removing the two nuts on the bumper ring that pull the metal bumper ring down. Then I remove the three screws (or nuts, depending on the game) that hold the bumper bracket to the bottom of the playfield. Upon removal of the bumper bracket shown below, I discovered that not only was the skirt chewed up by pinballs, but the bumper's metal yoke was broken and needed to be replaced. Yet another good reason for doing this repair. Then I de-solder the socket leads noting if one is longer than the other. In many cases, the bulb socket leads are stapled to the playfield to hold them in place. After de-soldering the leads, I use a pair of needle nose pliers and pull up on the end of a socket lead while trying to keep from pulling the staples completely out of the playfield. This is so I can tap the staples back down later after snaking the socket leads under the staples. After snaking the socket leads out from under the staples, I use my needle nose pliers to straighten the socket leads out as straight as possible (since they are bent at 90 degree angles after going through the playfield upon normal assembly) to assist in removing the bumper from the topside of the playfield. You can't get around this part as there is no way to remove the chewed up skirt without de-soldering the socket leads from below and then pulling the whole assembly off of the top of the playfield. You will find that you have to unscrew the two small screws that hold the yoke/stop retainer in place on the bumper bracket if you're replacing the coil plunger and/or the coil tube. While you're at it, don't forget to replace the coil tube with a new one since bumpers usually have worn and dirty tubes and you're there anyway, why go cheap now? In one of the pictures below I show the bumper "spoon" and the socket leads that have to be de-soldered from below the playfield. In this case, one of the leads is a little longer than the other. Remember which side has the longer lead since it affects the wiring for the bumper's bulb (one lead is the "common" side, the other is the hot side). If the leads are the same length, you'll have to inspect the body of the bulb socket later when you're ready to reinsert it into the bumper body so that you have the lead of the center conductor side of the bulb socket pointing to where the hot wire is for the bumper's light. The common side of the bumper's bulb is usually easy to determine on the underside of the playfield because you'll see a braided wire or just a simple wire of the same color going from one pop bumper light wiring location to another. Sometimes the hot wire has a clear piece of tubular insulation around it to keep it from shorting against the metal pop bumper assembly. Next, I'll be working from the top of the playfield since everything I need to do on the underside of the playield has been done. I remove the pop bumper cap small screws from the top of the pop bumper (a red cap in my example), and then the two screws that hold the bumper body in place. Now the pop bumper can be completely removed from the top of the playfield. After taking out the pop bumper, I remember how things came apart (due to taking a digial picture of the area which I can review later) and which way pieces faced so that I can reinstall parts back in their original order. Regarding the "skirt," I had a case where I ran out of a new red skirt and yet I needed to get the game back in working order for some play time when friends were coming over. What I did was a kludge, but it might allow you to get the game back in working order until your new skirt arrives. What you do is look at the side of the skirt that is chewed up by the pinball striking it. Then look at the top of the playfield and examine which side the pinball will strike on the skirt. Turn the skirt around so that the other non-damaged side will contact the pinball when it is reassembled. This will allow you to use the same old part but at least have it working correctly until the new skirt arrives. If the chewed up part is obvious when playing the game, or if the pinball strikes on both opposite sides of the skirt, you may not want to do this since it will make your game appear as though it's not kept in the best of shape. This is just a temporary fix and one that I've encountered when buying route games where the operator didn't take the time to replace the skirt, but also didn't want the chewed up skirt interfering with game play since only half of the skirt was being contacted by the pinball. Some route guys resort to using the wrong colored skirt with the pop bumper just to fix it so it plays OK. You may also want to replace the "bumper body" that resides on top of the playfield and guides the bumper metal ring. The plastic often gets chewed up and the bumper ring rods wear through the side of the plastic where the bumper ring rods move up and down. Now it's time to reassemble the bumper and attach it to the playfield from the top. First, I hold the bumper body with the bumper ring, skirt, spring, and bumper base attached with the socket leads protruding through the bumper body, and feed the socket leads and bumper ring rods through the top of the playfield being sure to get the socket leads in the proper direction (one was shorter than the other on mine). Then I screw down the bumper body with the two screws removed earlier to secure it in place so I can work on the underside of the playfield. Now that we're on the underside of the playfield to hook everything back together, and if you were careful in a previous step and kept the staples raised up so the socket lead can go under it, just snake the socket leads under the staples and tap the staples back into the playfield with a hammer. Then resolder the bulb lead wires to their associated leads to finish up the bulb socket connections. Now install washers on the bumper ring rods and lower the bumper bracket in place guiding the bumper ring rods through the metal/fiber yoke. Ensure that the metal bracket will not touch the socket leads/wires. In case the staple pulled out of the playfield and you don't have a small powerful stapler, you can use a hot glue gun to hold the wires in place. Then I tighten the three nuts that hold the coil assembly in place (sometimes these are screws rather than nuts) and tighten nuts on the bumper ring rods to secure the metal/fiber yoke to the bumper ring. I lift the metal/fiber yoke up and down a few times to ensure the bumper ring moves up and down easily. If not, something went wrong in the installation and is most likely the way the yoke/stop retainer and the metal/fiber yoke was reinstalled. On some games it could be that the coil wasn't reinstalled facing the correct direction. The only thing left to do now is replace the light bulb and replace the bumper cap from the top of the playfield. Sometimes you will find that the spoon has been bent a little and the skirt tip may not trip the coil that pulls the bumper ring down. That's why I turn the game on and test the skirt before reassembling the ramps that invariably cover the pop bumper. I also check the light in the pop bumper to ensure that it works correctly. That's about it. I have found that the only hard part to this whole process is removing all the other stuff so that I can get to the pop bumper (if the game is a DMD game). The older EMs and Solid State games usually allow free access to the pop bumpers. Once doing a rebuild, and assuming I have all of the parts such as the skirt, bumper body, a bumper bracket if I need it, and a new coil tube; I can replace all of the parts in about 15 minutes for each pop bumper. If I plan to reuse some parts such as the bumper body, skirt, and bumper base, it usually takes another 10 minutes or so to clean these parts for reuse. When I restore a game, the procedure described above works OK with the difference being that I buff the bumper ring on a buffer using white rouge, and I throw the bumper base spring, bumper body screws, cap screws, metal yoke retainer, and the plunger, in the tumbler for overnight tumbling to shine everything up. (click any picture to enlarge)
|