
|
This page is about creating decals for your Pinball game targets or spinners. Although you can buy decals if they are available, sometimes they aren't and you may need to create your own. I often make my own whether they are available or not since the process isn't that hard if you have a computer, scanner, photo editing software such as Photoshop, a good printer, and access to a laminating machine. That's about all it takes to create good results. I outline the steps below that I use when creating decals, and I have also supplied pictures and links to sites where helpful. So let's get under way. Quick Links
Equipment RequirementsComputer - doesn't have to be super fast since we aren't editing a movie, but a somewhat fast machine helps as you make changes to the images and want to see the results quickly. I use a 3 GHz computer, but I've also done it with a 1 GHz box. I also have 1 Gig of memory but have successfully created the images with 512 Meg. Below 512 Meg and you may find your computer swapping disk space for memory which will slow things down quite a bit. Lots of memory is always good. My computer uses Windows XP Pro for the operating system. I wouldn't use Windows ME or Windows 98 since they are too unreliable and you could lose all of your work if the system hangs. Scanner - I use a Microtek scanner with a Firewire cable for faster transfer speeds, but a USB scanner should work just as well. I typically scan other targets for duplication at a 600 dpi resolution since it's easier to correct in the photo editing software. If I can't get access to another target that has a decal that I need to scan, I try and get someone else to scan their target and send me the file. A 600 dpi scan can be somewhat large so you will need a high speed Internet connection if you plan to transfer scans back and forth with other people. I don't like 300 dpi scans since it requires a lot more work to correct the image. Anything below 300 dpi is not very usable for editing and a 72 dpi scan is absolutely worthless since it will have "jaggies." So I scan at 600 dpi and when finished editing my image I save it as a 300 dpi scan to print on a color laser printer. You could leave it at 600 dpi and print to most modern color inkjet printers if you wanted. Sometimes I scan complex images at even higher resolutions since the higher the resolution, the easier it will be to fix when editing. Photo Editing Software - I use Adobe Photoshop for editing my images. It's a very robust tool with many options and I find it to fit the bill quite nicely. I think that Paint Shop Pro will also work well although I haven't used it for a while. Adobe Photoshop Elements may not be quite up to par although I use it for editing digital pictures just fine. I edit a scan to straighten up any imperfections and then create a decal "sheet" of as many decals as I can print on an 8.5 X 11.0 sheet. I also try to create a border around the scan if possible since I need to know where to cut out the decals. For example, a Flash spinner decal has a lot of white near the edges of the scan which can make it hard to tell where to cut out the decal. A small border around the edge of the decal can be used to show where to cut the decal with scissors. Either that or a different color as a background color. If you are familiar with vector-based programs such as Adobe Illustrator, and you are willing to take the time to convert from a bitmapped image to a vector-based image, you will find it even easier to make decals. The nice thing about vector-based programs is that you can resize the image to any size and not lose the quality like you will with bitmapped images. Pantone Color Guide - this too is optional but really helps you pick the correct color for color corrections. Just match up a Pantone color guide chip to the decal color of interest and select the Pantone settings in Photoshop to match the color by its Pantone color guide number. I use the color guide since monitors rarely show the color exactly as it is. This is because the decal has a blend of colors and depending on where you use the color picker in Photoshop, you may pick a color that is lighter or darker than the true color. The Pantone color guide can also be used to buy paint for playfield touchups. Just match the color guide chip to the paint of interest and bring it with you to the paint shop where they will match to the color guide chip you choose. I bought mine online from Pantone directly for $80. Kind of expensive but saves a lot of time when doing color matching. Graphics Tablet - although this is optional, I use a Wacom Graphire 3 tablet that costs about 90 bucks. The graphics tablet will save you lots of time since a mouse is harder to operate when editing than a "pen" that is used with a tablet. You don't have to have a tablet, but it sure makes things easier if you plan to create more than a few different decals. Printer - I use a color laser printer to print my images. I sometimes use a Canon Inkjet printer for higher resolution images (pictures) of the decals. I edit a scan of a decal until it looks like what I want, then I create a larger 8.5 X 11.0 inch canvas and place as many copies of the decal as I can get on it. Sometimes I put target decals as well as spinner decals on the same sheet for a game. The main thing is to pack as much as you can on each sheet of vinyl for printing since there's no sense in wasting the vinyl sheets. Vinyl Sheet - I use a Vinyl white backed sheet (part number WPPABV-08) that I buy from www.mediastreet.com for printing my decals. It is called an "Outdoor adhesive-backed white vinyl - waterproof" vinyl sheet. It is an adhesive-backed white vinyl sheet that is used for outdoor signage that is waterproof (if you use waterproof inks) so it will stand up to just about anything. In the past I bought a package of 8.5 X 11.0 sheets that has 20 sheets to the pack, but lately I've noticed that they sell it by the roll which is too expensive. Note that media street also sells permanent inks, but I don't bother with this since I laminate the decal sheet with a clear laminate. After you laminate the decal sheet, cut out the decals and then apply them to a target or spinner, they recommend that you should leave the vinyl sheet laminated to the target/spinner for 24 hours to ensure adhesion. I've never tested if this is necessary or not. Sometimes I use a small roller such as the kind used for rolling wallpaper to press the decal to the target. Most of the time I just stick it to the decal and press it on real good with my thumb. You can also go to Papilio and try their product since it is cheaper and somewhat easier to use. I liked the media street product, but with them requiring me to buy an entire roll, I probably won't be doing this in the future. Laminate Sheet - I use a JM clear vinyl sheet for laminating my decal sheet. I do this to protect the ink from getting knocked off by the Pinball striking the target/spinner decal. It protects the decal and will last a long time. The clear vinyl laminate can be found in Walmart, Office Depot, or other office supply places. GBC also makes a clear laminate sheet as well, although I always use the JM laminate product. I buy mine at Walmart where it's sold as a laminate to cover photos and anything else you want to protect. People used them in the past for protecting their driver's license until states started laminating the license at the DMV. Laminator - I use an electric cold-press laminator that I bought at Office Depot to laminate the JM sheet to the white vinyl decal sheet I printed on the color printer. Note that it needs to be a cold press laminator. I paid about 75 bucks for a GBC Document Laminator that is a cold/hot laminator and use it on the cold setting. The clear laminate sheet product shows you how to get the lamination started (the laminator may show how to do it too). I separate the backing from the laminate about 3 inches and bend the backing sheet back out of the way. Then I place the sticky side on the face of the white vinyl decal sheet. Then I feed the sheets in to the laminator and watch that the backing sheet isn't pulled in to the laminator at the same time which will screw things up. As the two pieces feed through the laminator, the backing sheet will be left behind and the laminator will laminate the two sheets together with no bubbles. Sometimes I will feed the freshly laminated decal sheet through the laminator again to ensure the sheets are adhered very well. I leave the two sheets laminated together overnight before attempting to put them on the targets, but I'm not sure this is really necessary. Scissors - I use regular scissors to cut out each decal. Actually I give the decal sheet to one of my kids and have them cut out the decals since they seem to enjoy it. I used to automatically cut out the decals but now I leave the entire sheet in one piece until I actually plan to use the decals. Cutting out decals doesn't have to be precise since you often end up having to trim the decal to the target anyway. When you buy decals that have been professionally produced by someone in the printing business, you will notice that they have a nice clean edge. That's because they are die-cut rather than cut by scissors. Exacto Knife - I use an Exacto knife to trim the decal to the target to make sure edges don't protrude past the edges of the target. If they do protrude, you may find the decal separating from the target or spinner after awhile or getting black particles under the edges.
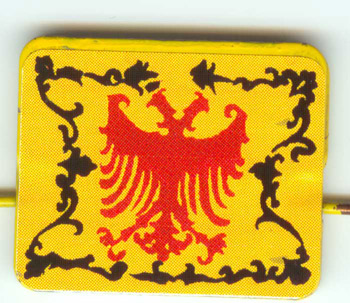
So those are the tools, now it's time to go through making a decal step by step. Note: click any picture to enlarge Scan A Target Or Spinner Decal I either scan an existing target or spinner decal that I have, or I get someone else to do it for me if I don't have one. I scan the decal at 600 dpi so that I can edit it using Photoshop.
This original scan is fine to work with as a base image. Note that you could simply download a scan if one is available, but since there was none, Doug was nice enough to remove the spinner from his game and scan it for me. I find that many of the images that can be downloaded off the Internet are scanned at 300 dpi or lower. This is somewhat OK if the images have already been edited, but if they haven't, it's a little harder to do the editing process due to the resolution and "jaggies." I prefer 600 dpi if I have to do any editing at all. If no editing is necessary, I'll take the 300 dpi image scans and feel lucky. If the resolution is much lower than 300 dpi (say, 72 dpi), the image is worthless and will look crummy under any circumstances.
I use Photoshop and a graphics tablet to edit the image. For this example, I used a Pantone color guide to select the correct colors of the spinner and then converted the scanned image to the correct colors using the magic wand tool and a paint brush and bucket tool. I used my graphics tablet to straighten out pieces that were not clear or that were missing using the paintbrush tool. Note that I needed an existing spinner to accurately match the colors. I had one since I have a Black Knight game, but mine was too chewed up to use as a scanned image. That's where Doug came in.
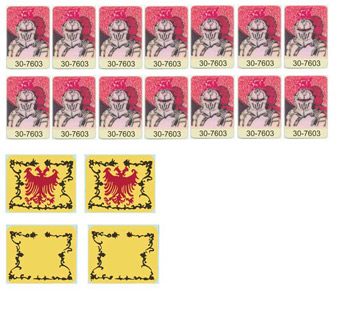
I copied the Black Knight 600 dpi adjusted spinner decal (front and back) along with adjusted target decals to an 8.5 X 11 canvas size at 600 dpi. Then I reduced the image to a 300 dpi quality page still at 8.5 X 11. The sheet below shows how I put an array of decals on to a single 8.5 X 11 sheet for easy printing. Actually, I have two of these files that contain the images. One sheet has as many as I could cram on a single sheet and the other shows enough for a single game (the one shown below). Truth be told, I print a sheet that is crammed with decals since I don't like to waste the white vinyl sheets but even the one below has plenty of extra target decals and an extra set of spinner decals.
Here is an example of the Black Knight spinner and decal sheet that I created as a free download on my Black Knight page. Please note that this is NOT the full 4 meg size file, but a reduced file for easy viewing for this discussion. If you want the actual sheet, go to my Black Knight page and follow the directions for downloading the 4 meg sheet. Note that my sheets are for hobbyists, not people making a buck on selling decals (I spent a lot of time straightening up these images).
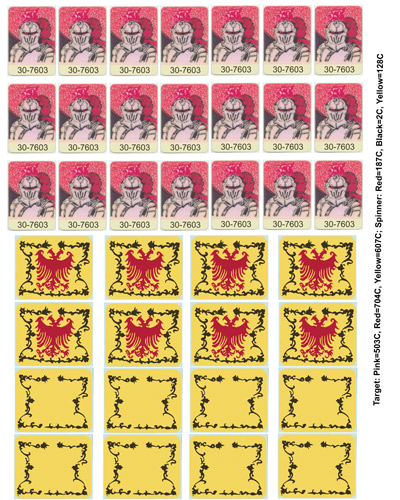
As I previously mentioned, I created the decal sheet above for someone to download and create their own decals. The sheet I print at home has quite a few more decals on it but the file size eats up too much space on my website, so I provide the reduced sheet as shown above. The image to the right shows the decal sheet I print at home. Note that I also include the Pantone color settings as part of the decal sheet so that I will know what they are for future reference.
First, I print the decal sheet on my color laser printer using regular white paper. I end up printing the images several times. That's because I need to check my printer settings and adjust accordingly for the correct color since the printer color output usually doesn't match the image's color shown on my display. My printer doesn't have Pantone color profiles so I often end up adjusting the color by making it darker or lighter, and/or the contrast brighter or lighter until the colors match close enough. Then after experimenting with regular white paper, I insert the white vinyl in the optional tray of my printer and print it making sure to have the white side faced correctly so that I don't print on the backing material. If you print on the wrong side, the ink or the toner will not stick to the backing. This is an indicator you printed on the wrong side of the white vinyl and you'll have a bunch of flaking toner to deal with.
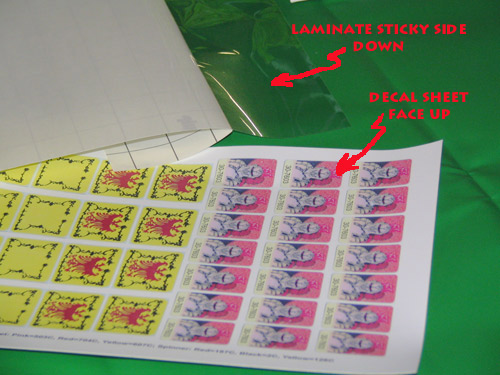
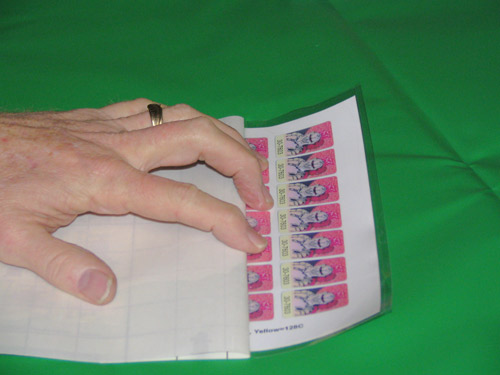
The backing material of the clear laminate needs to be separated from the sticky side by about 3 inches before trying to adhere it to the decal sheet. You only need to separate about 3 inches because any more than that, and you may end up getting bubbles of air trapped between the laminate and the decal sheet. You bend the backing material back out of the way so that the two sheets can be fed in to the laminator correctly without pulling the backing sheet through at the same time. Then the laminate is placed sticky side down at the top of the decal sheet overlapping by about a half inch so that the laminating sheet's sticky surface starts at the top of the decal sheet. I trim the excess laminate from the leading edge of the pair of sheets with scissors before feeding it in to the laminator so the sticky side of the clear laminate doesn't adhere to the cold press laminator rollers (there are two pinch rollers that roll together as they laminate). This is an important point since if the laminate sticky part adheres to the roller, it will try to wrap around the roller as the motor feeds the combined sheets through the rollers. This will ruin your decal sheet as it begins to wrap around and wrinkle. You will also have to disassemble the laminator to get the decal sheet off of the roller since it will be wrapped around it. I made this mistake several times before I caught on that the sticky part of the laminate on the leading edge, despite only being a half inch, was adhering to the roller and sometimes would stick to the roller and wrap around, while other times it would feed through correctly. You may wonder why I didn't simply line up the leading edge of the laminate with the top of the decal sheet. That's because the manufacturer created laminate that has a very small part on the leading edge that isn't sticky. This is so the backing sheet can be easily removed. I think you'll find that it's easier to overlap the decal sheet with a half inch of laminate and then trim it with scissors before feeding it in to the laminator. Since this is probably the most confusing part of the process, here is another description of what is done with the laminate and decal sheet in preparation for the steps I have illustrated below with pictures: 1. Place the laminate sheet face down (backing side will be face up). 2. Peel back the backing about 3 inches folding it back out of the way and crease it with your fingers. 3. Lay the vinyl decal sheet face up (printed side up). 4. Flip the laminate sheet over so the sticky area exposed in Step 2 is face down in preparation for placing it over the decal sheet. Note that the laminate backing will be folded under the laminate sheet and will be between the face-down laminate and the face-up decal sheet. 5. Square up the laminate so it will completely cover the decal sheet (the laminate sheet is 9 X 12 inches so it's larger than the 8.5 X 11 inch vinyl decal sheet) while overlapping the top of the decal sheet by a half inch. Once aligned, and starting at the top of the decal sheet, press the sticky side down with your fingers so that it adheres to the face up decal sheet. Rub towards the laminate's backing to force out any bubbles of air that may exist between the laminate and the vinyl decal sheet. 6. Pick up the two sheets together and using scissors, trim the part of the laminate that overlaps the decal sheet at the top (the half inch overlap at the top of the sheet). This is to prevent the sticky part of the laminate adhering to the laminator rollers. 7. With the face-down laminate on top of the face-up decal sheet, feed the leading edge of the sheets together in to the laminator. The "leading edge" of the sheets is the part of the laminate and decal sheet that were stuck together in Step 5. Depending on the laminator, you may have to separate the backing a little more before the laminator pinch rollers grab the sheets and start pulling them through. 8. Either flip the laminate sheet over the laminator out of the way so the backing sheet will automatically separate as the sheets are pulled through the pinch rollers (shown in a later picture), or use your fingers to ensure the backing sheet is not pulled through the laminator with the laminate and decal sheets that are being pulled through the laminator. If you see the backing sheet being pulled in with the laminate and decal sheet, immediately turn off the laminator, disassemble it, separate the pinch rollers, remove the laminate and decal sheet, reassemble the laminator, and feed it through again this time ensuring the backing sheet is separating from the laminate as the sheets are pulled through the laminator. 9. Once the laminate and decal sheets have been fed through the laminator and have exited the other side, the laminate backing sheet will be left loose by itself. You can throw the backing sheet away at this point since it has no more value by itself. 10. Trim the excess sticky laminate protruding along the sides and trailing edge of the decal sheet. Decals can now be cut out or you can choose to feed the laminated sheet through the laminator again if you like. Basically, you are finished at this point. The following pictures with their descriptions should help the preceding steps become more apparent.
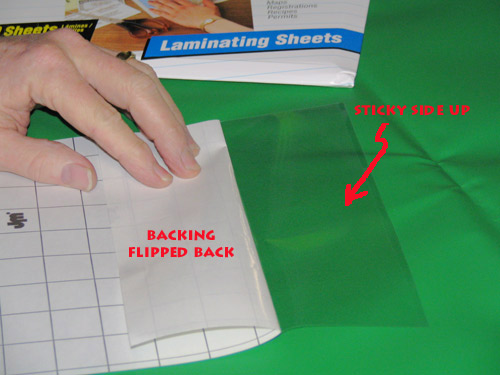
Here is a picture of the laminate backing sheet separated before applying to the decal sheet. The sticky side is up in this picture. Note that I separate the backing sheet and bend it back from the sticky side several inches and fold it. This is in preparation for applying the sticky side of the laminate to the vinyl decal sheet. I only expose a few inches of the sticky side of the laminate to keep from getting bubbles forming between the laminate and the decal sheet.
This picture shows the laminate sheet ready to be applied sticky side down on top of the vinyl decal sheet. Note the laminate backing flipped under.
The picture at the right shows the laminate sheet with the sticky side down being pressed on to the vinyl decal sheet before feeding in to the cold press laminator. Note that the backing sheet is still folded under and back several inches.
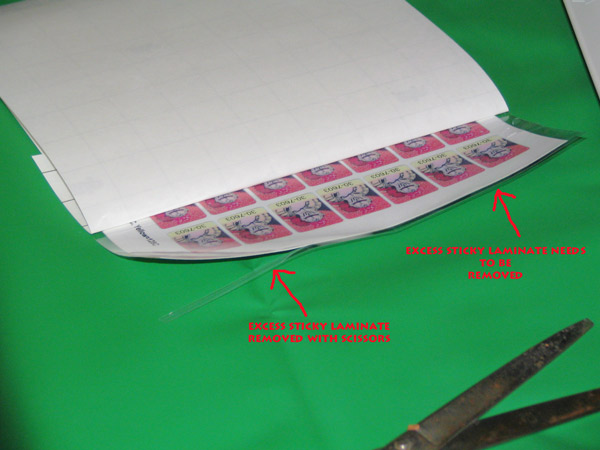
The picture above shows where I have partially trimmed the excess sticky part of the laminate that protrudes past the edge of the vinyl decal sheet (sticky side is down in this picture). I do this so that the excess sticky part doesn't adhere to the laminator pinch rollers as it feeds through the laminator. If I didn't do this, it could end up wrapping around the laminator roller. If it does wrap around the pinch roller, you will have to disassemble the laminator and unwrap the sheet. Note that if it wraps around the laminator roller even a little bit it will be ruined and you will have to start over from scratch (re-print the decal sheet, reapply the laminate, etc).
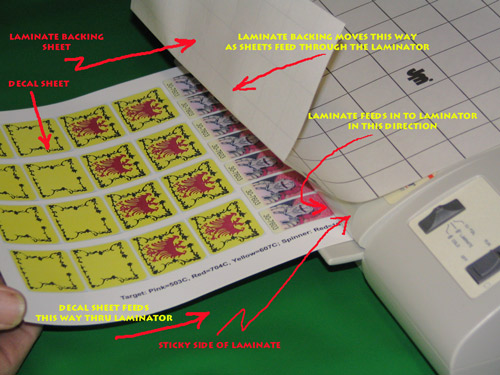
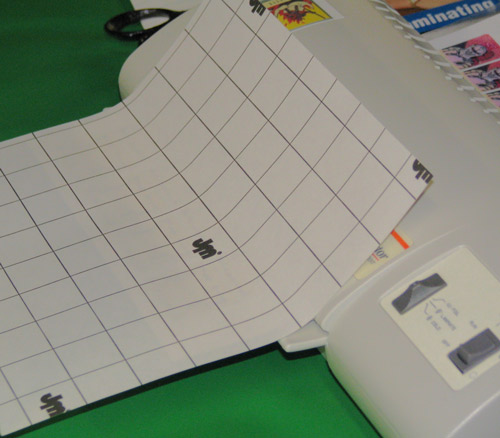
The picture above shows the laminate sheet and vinyl decal sheet feeding through the cold press laminator. Notice that you can see the laminate and its backing sheet flipped out of the way as the vinyl decal sheet feeds through (look closely just above the pink target decals and you can see the laminate flipped back with the backing separating as they feed through). This causes the backing sheet to automatically separate as the laminate and decal sheets feed through the laminator. Watch this carefully since it is possible for the backing sheet to also feed through along with the laminate and vinyl sheet. If this happens you will have a mess on your hands and will likely have to disassemble the laminator and remove the sheets. Once you have it removed, you can try and feed it through again being careful to ensure the backing sheet separates as the two sheets feed in to the laminator. The backing sheet does NOT feed through the laminator, it separates as the laminate and vinyl decal sheets feed through together.
In this picture you can see that the decal and laminate sheets have moved through the laminator and have been pressed together. The backing sheet has separated and is just laying against the laminator.
I use scissors to trim the sticky laminate excess from the sides and trailing edge of the decal sheet. That's because the laminate sheets are larger than 8.5 X 11 inches (the laminate is a 9 X 12 sheet). If you don't trim this and set the laminated decal sheet on something, the sticky backing of the clear laminate will stick to whatever it comes in contact with. Don't forget this important step or you may unexpectedly ruin something you set the decal sheet on.
Here is the finished decal sheet. I created a new decal sheet just for this how-to exercise, and from beginning to end, it only took me 15 minutes to print the sheet, prepare the laminate sheet, press the laminate sheet to the vinyl decal sheet, feed it through, and snap this picture. The photo editing process was not nearly as short. Not bad.
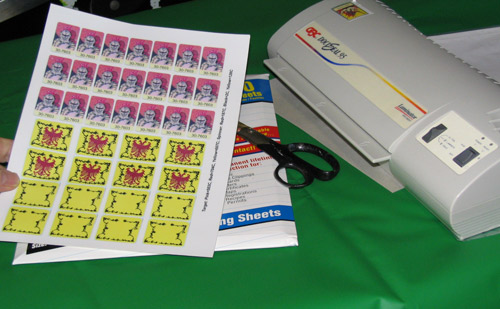
Cut Out, Apply, And Trim The Decals I simply use scissors to cut out the decals from the laminated decal sheet. Not much more to say about this obvious step. Use your fingernail to separate the white vinyl decal's backing sheet and apply it to the target or spinner. Once the decal is applied, I use an Exacto knife to trim any excess decal that protrudes past the spinner or target edge.
Well, this about wraps up the whole process. The time-consuming part of this effort is using Photoshop to adjust the image. Just to give you an idea, I spent about 10 hours adjusting the Black Knight spinner images (front and back). That's because I don't use Photoshop on a day-to-day basis, so I'm not that adept, and I ended up getting access to several partially destroyed Black Knight spinners which seemed to have different artwork. This made it a little tougher since I had to free-hand draw a composite of several BK spinner decals. If you get a good image (such as one of my decal sheets that I have on other web pages, e.g., the Black Knight web page), you can simply start with the printing part of this exercise and it will be much easier. Thanks again to Doug Grant for taking the time to remove his Black Knight spinner from his game, scan both sides multiple times, and then send me the files that I used as the basis for my spinner decals. Remember that the decal sheets I create are to be used by Pinball hobbyists and not for people attempting to sell them. I spent a lot of time on creating them and post them for hobbyists so that they will not have to spend as much time during the creation process. Hope you found this useful. Any questions or constructive criticism is welcome. I'll make changes to these instructions to make them more clear if I receive some good tips.
|
 This
picture is an example of a
scanned
This
picture is an example of a
scanned  Here is the