Pinball Dolly
Construction
While
investigating the purchase of a Pinball Dolly, I found that they can cost as
much as 350 bucks. Then I came across a posting on rec.games.pinball by Steve Thompson regarding a motorcycle "lift"
that he had found at the local Costco store and it only cost about 90
bucks! Well, that tweaked my interest and after visiting the local
Costco store, sure enough it wasn't a one time sale, they had about ten or
so lifts in boxes that weighed about 80 pounds on the shelf near their auto
stuff. I've also seen them at Sears and Sam's Club for around the same
price or maybe a little cheaper, but using a different box (same exact
looking lift though).
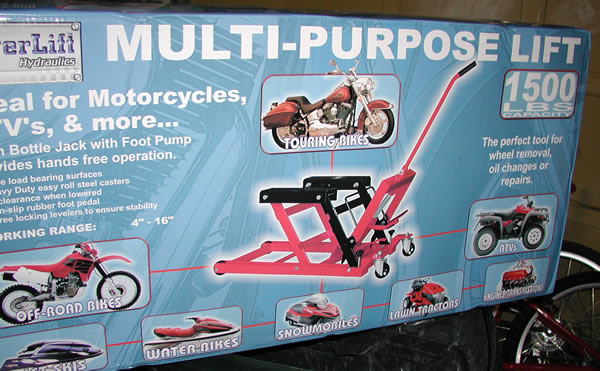
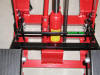
It's made of solid steel and uses a hydraulic "jack"
that raises some "lift pads" by using your foot or hand on a
pump-up foot
pad. It also has a separate foot pedal for lowering the game as well as a
safety mechanism so that the game can't be accidentally let down once the
safety mechanism is
engaged. It
includes a removable handle as well. You'll want to remove this to get it
far enough under the game or to keep from gouging other games as you wheel
your game around. There are also a couple of screws at the back of the
lift that can be tightened that will keep the lift from moving around on the
floor although I've never actually found the need to use them.
I bought one and after some minor assembly
discovered that as mentioned by Steve Thompson, this would work perfectly as a Pinball Dolly and for a heck
of a lot less money. Not only that, but this lift can handle 1500
pounds of weight and can be used as a lift for other things than just
Pinball games (such as my wall oven/microwave combo I recently had to fix). It stores quite well and is out of sight if stored
under a game and pushed all the way back against the wall. The picture
below shows the box the lift comes in so you can readily identify it at the
Costco store. See the additional pictures at the bottom of this page for
reference.
(click picture to enlarge)
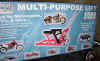
Lift Cardboard Box
There Is A
Slight "Problem"
The only problem is
that the lift wouldn't go up high enough to actually raise the game off the
floor. To solve this problem I created a "box" that I made
out of scrap Redwood left over from a deck building exercise and was
able to find a method that worked fine for me. I made mine using 2X6
Redwood (only because that was the scrap wood available, you could use Pine
wood as well) with a 1/2" sheet of plywood over the top of it.
Tried it out and realized that although it would raise the game, it still
wasn't high enough off of the floor. So I cut two Redwood 4X4s and
laid them on top of the box as you'll see in the picture below and that did
it! The only problem is that these 4X4s are not secured to anything
and moving
a game could be unstable despite the rather heavy weight of a Pinball game.
That led me to a newer box design that stabilizes the whole setup.
The picture
below shows the first "box" that I made to compensate for the lift not
going up high enough to completely elevate the game off of the floor.
This box can be used in conjunction with the lift to lift other items than
Pinball games. Problem is, it still isn't high enough to properly lift
a Pinball game.
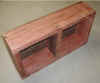
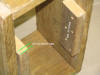
Original Wooden Box
I finally got tired of wondering if the 4X4s
I place on my original smaller box were perhaps moving around while navigating around my many Pinball games,
and decided to build a better, more secure, box. Here's a picture of the
new box:
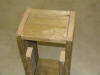
Larger Wooden Box (recommended)
Box Construction
Smaller Box Construction: Note the box
construction shown in the first picture above (I show the box from the underside). I made
mine wide enough to handle a wide-body game such as a Twilight Zone and that
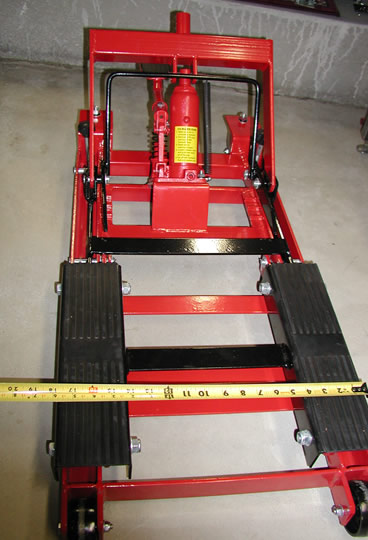
meant cutting the longest 2X6s 25 inches long. Since the lift pads are
14 inches long, I cut three 2X6s to 11 inches long (14 inches minus the
thickness of two 2X6s - 3 inches) so that they would fit between the two
longer 2X6s. I used some leftover deck screws (about 3 inches long) to
tighten everything together with the heads of the screws countersunk.
Then I cut a piece of plywood that was equal to the measurements of the box
that I created out of 2X6s. The two 4X4s were cut to 25 inches long and
were laid on top
of the Redwood box as shown in the picture. You could use this way to
build the box if you'd like (maybe the only scrap wood you have around is
the sizes I mention above), but I would use the new and improved box
construction that I will next describe. Having a couple of boxes
around isn't a bad idea since I've found that I can lift several things with
the motorcycle lift such as a large screen TV and a wall-mounted
oven/microwave combo unit I fixed. I'd go with the next method though
for Pinball games.
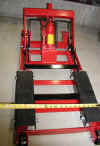
New Improved Box
Construction (Recommended):
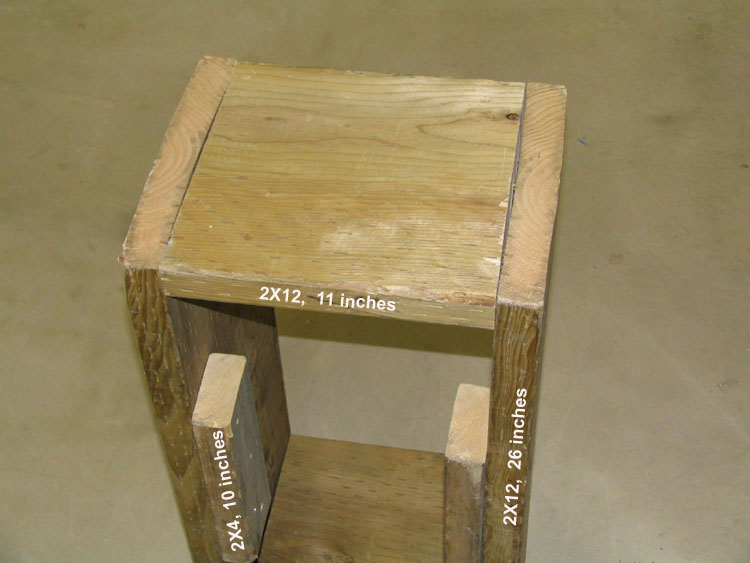
The key thing you are after here is the 2X12s and smaller "locking" 2X4s
that prevent the box from rotating when you have a Pinball game jacked up
off the floor. The 2X12s save you the need for using the 4X4s I
mentioned earlier, and the 2X4s are mounted just below the edges of the
2X12s so they can lock between the lift pads of the motorcycle lift to
prevent the box from rotating while lifting a Pinball game.
Constructing the box is rather simple and requires the following boards:
2 - 11 inch 2X12 boards (the end boards)
2 - 26 inch 2X12 boards
2 - 10 inch 2X4 boards
As you can probably tell by my pictures, the
2X12s are nothing more than pressure-treated 2X12 leftovers I had from
making stairs to my deck. The boards don't really need to be
pressure-treated, it's just that I had these leftover boards laying around
and decided to use them. The 2X4s are mounted to the sides of the
longer boards (26 inch boards) about a half-inch down from the edge of each
board (protrudes lower than the main box since these 2X4s will fit between
the dolly "lift pads" to keep the box from rotating. The 2X4s are
centered in the box and for mine, this meant they were 6 and 5/8 inches from
the end boards (the 11 inch 2X12s). I figured I may as well use my
leftover deck screws too, so I fastened the box and the 2X4s using 3 and 1/2
inch deck screws. The box is rock solid, but somewhat heavy since I
made it from pressure-treated wood. I think it would be a lot lighter
and less splinters if I used Fir or Pine for the boards. Note that
this method didn't require a piece of plywood (although one could be added)
and I use the box just as it is. I also changed the design to 26 inch
2X12s instead of 25 inch boards so that I was sure the box was wide enough
to go under a wide-body game without having to be overly precise about the
placement of the dolly under the game box.
I position the dolly under the game (first
without the box) until I get it somewhat centered up, then I slide the box
under the game from the side and put it on top of the lift pads ensuring the
box is centered up correctly (minor effort, you'll see what I mean when you
try it) so one edge of the box is not off of the lift pads. The
dimensions I gave above will fit any wide or narrow body game from old EMs
to newer Solid State games. Then I just pump on the foot pedal to
raise the game. Note that as you lower the Pinball game it will not
drop straight down vertically but will instead lower somewhat further away
from you (due to the jacking mechanism and how it works).
Uses For The Pinball Dolly
So far I use this dolly quite a bit since I
have 18 Pinball games set up and I'm often either shopping a game or repositioning games to a different lineup (some games coincide better with
others when next to each other). Here are some of the tasks I do somewhat often that involves the Pinball Dolly:
-
Playfield Cleaning - ever tried to squeeze
between the sides of two games that are set up rather close to each other so
you can do some cleaning? Kind of a pain in the neck (as well as the
back). I simply roll the jack under the game, put the box on the lift
pads, and roll it out to the middle of the floor where it's a lot easier to
work on it. Since I have games leveled up at a certain position and my
floor angles somewhat in the basement, I form an L shape with masking tape
on the floor where the leg-levelers contact the floor to ensure a back leg
and a diagonal front leg go back to their original positions.
-
Leg Cleaning - sometimes it's easier to
remove the legs and clean them while they are off of the game. You
can jack up the game and leave it on the lift while you do some or all
of the leg cleaning. I usually roll the game out, remove the legs,
clean them, and roll the game back in place.
-
Game Shopping - this works out well since I
need all the space I can get and don't need a game stuck out in the middle
of the floor until I finish shopping it. I know where the game will
eventually be placed, so I roll the game in where I plan to place it, and
then roll it out to shop it. I roll it back in to place after I'm
finished for the evening. Don't know about you, but I don't get all
the shopping done in one day so this is a convenient way to roll it out,
work on it, and roll it back at my convenience without leaving it to walk
around when I want to do something else such as play a game of Pinball.
-
Game Repairs - sometimes I need to make a
quick repair that is almost always at the back of the game. Roll it
out, fix it, roll it back - just that simple.
-
Game Leveling - games seem to get out of
level due to people jostling them around or they weren't set up level in the
first place. Raise the game up and adjust the leg levelers to set
the game up as it should be and then lower it back down. Better than
the old way of getting underneath a game and using your back to raise the
game as you quickly fool with a leg leveler.
-
Battery Replacement - how about changing
those batteries in the backbox? I think you get the gist - roll it
out, replace the batteries, and roll it back. I write the date I
changed the batteries with a black Sharpie on the batteries since I have
games coming in at different times of the year. I also put a strip of
masking tape on the coin box and write the date on it so I can check the date easily without
having to roll the game out unnecessarily. I've heard folks say to
exchange the batteries on the same day of every year, but I have too many
games moving around at different times of the year and quite frankly, I
don't have enough time to change out every battery on one day of the year.
Too many games and too much hassle to be done in just one day.
Dolly
Pictures
The pictures
below show the Pinball Dolly in more detail and positioned under my Twilight
Zone game box. Note the 4X4 "workaround" that I had to
use. I found the "workaround" made me question the safety, so I
constructed a better box shown at the bottom of the pictures below. I
still use the smaller box for lifting other stuff around the house now and
then (such as a heavy 37 inch TV). Thanks again for the tip by Steve
Thompson.
 |
 |
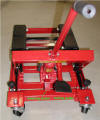
Dolly
from the handle view.
Note the foot pad on the
right for raising the game
and the foot pad on the left
for lowering the game. The two
knobs can be screwed in
to keep the Dolly
from moving around on the floor.
|
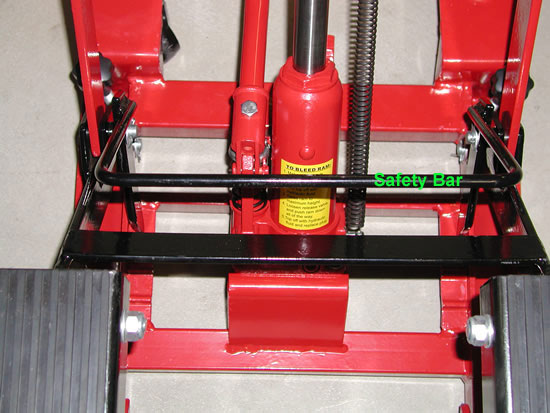
Hydraulic
"Jack" and safety bar.
|
 |
 |
|
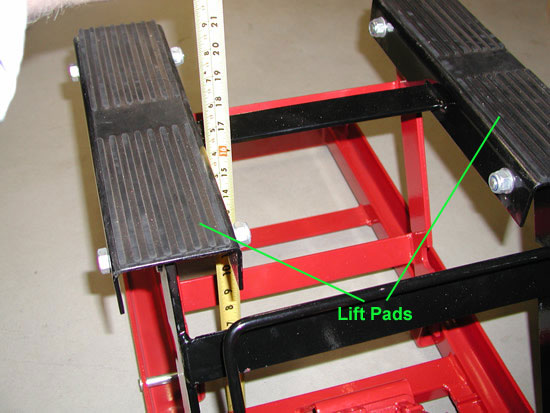
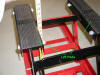
Full
height of about 16 inches.
|
Lift
pad width of 18 inches.
|
 |
 |
New and improved box
(includes dimensions). |
New and improved box
showing 1/2 inch drop. |
|
All
Graphics & Text © Steve Corley |
|
The
pictures you see were created by Steve Corley unless otherwise
noted.
Unauthorized use is strictly prohibited |
|